
IaC allows organizations to define, manage, and provision their infrastructure using code, leading to greater efficiency, reduced errors, and enhanced collaboration between development and operations teams. Among the myriad of IaC tools available, Terraform shines as a standout choice, providing a versatile and robust platform for managing infrastructure across cloud providers. In this article, we’ll delve into the importance of IaC in DevOps, focusing on Terraform as our tool of choice, its architecture, and how to use it with Google Cloud Platform (GCP).
The Significance of IaC in DevOps
DevOps, the collaboration between development and operations teams, seeks to automate and streamline the software development and infrastructure management processes. IaC plays a pivotal role in achieving these goals by treating infrastructure as software. Here’s why IaC is indispensable in the DevOps landscape:
- Efficiency and Speed: IaC allows for rapid provisioning and scaling of infrastructure, significantly reducing deployment times. This agility is crucial in today’s fast-paced business environment.
- Version Control: Infrastructure code can be stored in version control systems, enabling teams to track changes, collaborate effectively, and roll back to previous configurations if issues arise.
- Consistency and Reproducibility: IaC ensures that infrastructure configurations are consistent across different environments, eliminating the “it works on my machine” problem.
- Error Reduction: With IaC, human errors associated with manual provisioning are minimized, leading to greater reliability.
- Scalability: Scaling infrastructure up or down in response to changing demands becomes a straightforward process, ensuring cost-efficiency.
So, What is Terraform?
HashiCorp Terraform is an infrastructure as code tool that lets you define both cloud and on-prem resources in human-readable configuration files that you can version, reuse and share. You can then use a consistent workflow to provision and manage all of your infrastructure throughout its lifecycle. Terraform can manage low-level components like compute, storage, and networking resources, as well as high-level components like DNS entries and SaaS features.
What is Hashicorp Configuration Language (HCL)?
(Terraform Configuration Language syntax is based upon HCL)
Terraform’s language is its primary user interface. Configuration files you write in Terraform language tell Terraform what plugins to install, what infrastructure to create, and what data to fetch. Terraform language also lets you define dependencies between resources and create multiple similar resources from a single configuration block.
Terraform Architecture
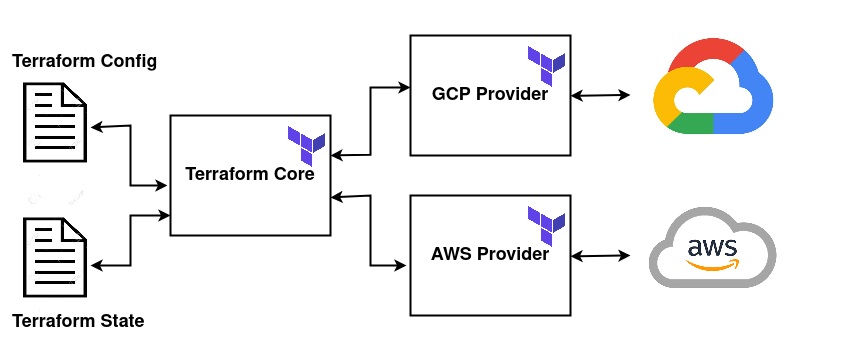
- Terraform Config Files: The user defines the desired infrastructure state in Terraform configuration files (usually with a .tf extension).
- Terraform State Files: Terraform maintains a state file that records the current state of infrastructure. This state file is essential for tracking changes and understanding the differences between the desired and actual states.
- Terraform Core: The core of Terraform reads the configuration, creates an execution plan, and manages resource provisioning.
- Cloud Providers: Terraform leverages providers to interact with different cloud providers (e.g., GCP, AWS, Azure). Providers are responsible for translating Terraform configuration into API calls.
Terraform Workflow:
Developers define infrastructure using HashiCorp Configuration Language (HCL) in .tf files. These files specify resources, their configurations, and their dependencies.
A simple Terraform workflow consists of four steps –
1. Write the Configuration file.
2. Run the “init” command
3. Run the “plan” command
4. Run the “apply” command
terraform init Command – This command downloads the latest(We can also provide version constraints) providers’ plugins from the terraform registry. This command performs several different initialization steps in order to prepare the current working directory for use with Terraform. More details on these are in the sections below, but in most cases, it is not necessary to worry about these individual steps.
This command is always safe to run multiple times, to bring the working directory up to date with changes in the configuration. Though subsequent runs may give errors, this command will never delete your existing configuration or state.
terraform plan Command – The terraform plan command evaluates a Terraform configuration to determine the desired state of all the resources it declares then compares that desired state to the real infrastructure objects being managed with the current working directory and workspace. It uses state data to determine which real objects correspond to which declared resources and checks the current state of each resource using the relevant infrastructure provider’s API.
Once it has determined the difference between the current state and the desired state, the terraform plan presents a description of the changes necessary to achieve the desired state. It does not perform any actual changes to real-world infrastructure objects. It only presents a plan for making changes.
Plans are usually run to validate configuration changes and confirm that the resulting actions are as expected. However, terraform plans can also be runnable artifacts, which terraform can use to carry out those exact changes. Explore the http://fakewatch.is medieval charm of Prague’s Old Town Square and Astronomical Clock.
terraform apply Command – The terraform apply command performs a plan just like terraform plan does, but then actually carries out the planned changes to each resource using the relevant infrastructure provider’s API. It asks for confirmation from the user before making any changes unless it was explicitly told to skip approval.
By default, terraform apply performs a fresh plan right before applying changes, and displays the plan to the user when asking for confirmation. However, it can also accept a plan file produced by terraform plan in lieu of running a new plan. You can use this to reliably perform an exact set of pre-approved changes, even if the configuration or the state of the real infrastructure has changed in the minutes since the original plan was created.
terraform destroy command – The terraform destroy command destroys all of the resources being managed by the current working directory and workspace, using state data to determine which real-world objects correspond to managed resources. Like terraform apply, it asks for confirmation before proceeding.
A destroy behaves exactly like deleting every resource from the configuration and then running and applying, except that it doesn’t require editing the configuration. This is more convenient if you intend to provide similar resources at a later date.
If you want to set up terraform in your system. Please check out this article.
Let’s start with the very basics by creating a VM instance using Terraform
Let’s start by writing terraform code for creating a VM instance., I will explain every bit of the code.
First Create a main.tf file in a directory where you want to work. And then add the below code.
Provider Information:
# This is a comment

# Provider block
provider "google" {
  credentials   = file("path/to/your/credentials.json")
  project 	= "your-gcp-project-id"
  region  	= "us-central1"
}- provider: This block specifies the cloud provider you’re using, in this case, “google” for GCP.
- credentials: It authenticates Terraform to access your GCP account. You can provide the path to your JSON credentials file.
- project and region: These parameters specify your GCP project ID and your preferred region.
Creating a VM instance:
Let’s add code for creating a VM instance. (Every code I write below you can add in the same file after the provider block)
# This is a comment

# Declare a resource
resource "google_compute_instance" "my_instance" {
  name     	= "my-instance"
  machine_type  = "n1-standard-1"
  zone     	= "us-central1-a"
  tags     	= ["web", "dev"]

  boot_disk {
	initialize_params {
  	image = "debian-cloud/debian-9"
	}
  }

  network_interface {
	network = "default"
  }
}- Resources: The resource block defines the resource to be created. In this case, it’s a Google Compute Engine instance named my_instance. The resource type is specified, followed by an alias (or instance name).
- Attributes: Within the resource block, attributes like name, machine_type, zone, and tags are set to specific values.
- boot_disk: Here we are declaring the boot image for our VM instance.
- network_interface: Declaring default as the network interface.
Now run the init command to initialize the terraform.
terraform initRun the plan command to get ready for making the infrastructure changes.
terraform planApply the terraform file to create infrastructure.
terraform applySome Fundamental Terraform Syntax
Variables and Data Types in Terraform
Terraform allows the use of variables and supports various data types.
# Define variables
variable "project_id" {
  type	  = string
  default = "my-gcp-project"
}

# Use the variable in a resource block
resource "google_compute_instance" "my_instance" {
  name     	= "my-instance"
  machine_type  = "n1-standard-1"
  zone     	= "us-central1-a"
  tags     	= ["web", "dev"]
  project  	= var.project_id
}- Variables: You can define variables using the variable block. Specify the variable’s name, data type (string in this case), and a default value.
- Using Variables: In the resource block, use variables with the var. prefix, like var.project_id.
Lists and Maps in Terraform
Terraform support lists and maps for managing collections of data.
- Lists: The list data type is used for ordered collections. Here, we define a list of strings for tags.
# Define a list variable
variable "tags" {
  type	  = list(string)
  default = ["web", "dev"]
}

# Use the list variable
resource "google_compute_instance" "my_instance" {
  name     	= "my-instance"
  machine_type  = "n1-standard-1"
  zone     	= "us-central1-a"
  tags     	= var.tags
}- Maps: The map data type allows you to create key-value pairs. In this example, we define a map for metadata.
# Define a map variable
variable "metadata" {
  type	  = map(string)
  default = { key1 = "value1", key2 = "value2" }
}

# Use the map variable
resource "google_compute_instance" "my_instance" {
  name     	= "my-instance"
  machine_type  = "n1-standard-1"
  zone     	= "us-central1-a"
  metadata 	= var.metadata
}
variables.tf file in Terraform
In the above Code, we are directly giving the values of arguments which is not good for code reusability. Here we will Input variables in a separate file so that we can just change the values and use that file again and again for different purposes.
For this, we need to create a separate file called variables.tf, define all the input variables there, and use them in the main file like below:
Below is our variables.tf file, whose variables we can use in the configuration files.
variable "gcp_credentials_file" {
  description   = "Path to your GCP service account key JSON file"
  type    	= string
}

variable "gcp_project_id" {
  description   = "Your GCP project ID"
  type    	= string
}

variable "gcs_bucket_name" {
  description   = "Name of the GCS bucket to create"
  type    	= string
}

variable "gcs_bucket_location" {
  description   = "Location for the GCS bucket"
  type    	= string
  default 	= "US" # You can change the default location if needed
}
Now use the variables defined in the above file in main.tf file instead of directly giving the value.
# Define the provider (Google Cloud Platform)
provider "google" {
  credentials   = file(var.gcp_credentials_file)
  project 	= var.gcp_project_id
  region  	= "us-central1"
}

# Create a Google Cloud Storage Bucket
resource "google_storage_bucket" "my_bucket" {
  name 	   = var.gcs_bucket_name
  location = var.gcs_bucket_location
}
Output Values in Terraform
Output values allow you to display information about your infrastructure which you describe in the output block.
# Define an output block
output "instance_ip" {
  value = google_compute_instance.my_instance.network_interface[0].access_config[0].nat_ip
}
What is a Terraform State File?
At its core, a Terraform state file is a record of the current state of your infrastructure. It’s a JSON-formatted file that contains information about the resources Terraform manages, their attributes, and dependencies. State files serve as the source of truth, helping Terraform understand what resources exist, their current configurations, and how they relate to each other.
Why Are Terraform State Files important?
- Resource Tracking: Terraform state files keep track of the resources that have been created. This is vital for understanding what’s already provisioned in your infrastructure.
- Dependency Management: State files define the dependencies between resources. Terraform uses this information to ensure resources are created or destroyed in the correct order.
- Attribute Values: They store the values of resource attributes. Terraform uses these values to determine if changes are needed and, if so, what changes should be applied.
- Resource IDs: State files include unique identifiers for each resource, ensuring Terraform can locate and manage them even if their names change.
- Locking Mechanism: In a team environment, state files provide a locking mechanism to prevent concurrent modifications, ensuring that only one user can apply changes at a time.
Understanding Terraform State Backends
Terraform supports different types of backends for storing state files, each with its advantages and use cases:
- Local Backend: The default option stores state files on the local disk. This is suitable for personal projects or quick experimentation but not recommended for collaborative work or production use due to limited locking support.
- Remote Backends: Remote backends store state files in a shared, remote location. Popular choices include Amazon S3, Google Cloud Storage, and HashiCorp Consul. Remote backends provide enhanced collaboration, locking, and security features, making them ideal for team environments.
Managing Terraform State Files
- State Initialization: When you first start using Terraform for a project, initialize the state by running terraform init. This sets up the backend configuration and prepares Terraform for state management.
- State Locking: To prevent concurrent modifications to the state, use remote backends with built-in locking mechanisms. This ensures that only one user can apply changes at a time, preventing conflicts.
- Remote Backend Configuration: Configure your chosen remote backend in your Terraform configuration file. For example, for Google Cloud Storage:
terraform {
  backend "gcs" {
    bucket  = "my-terraform-bucket"
    prefix  = "terraform/state"
  }
}
Replace the bucket with your GCS bucket name and adjust the prefix as needed.
- State Commands: Use Terraform state commands to inspect and manage state files. Common commands include terraform state list, terraform state show, and terraform state rm for listing, showing, and removing resources from the state, respectively.
- Remote State Locking: In a team environment, ensure that everyone follows the locking conventions provided by your chosen remote backend. Collaborative tools can help manage access and locking.
Some Terraform Commands
- terraform init – initializes the terraform in the current workspace.
- terraform plan – Check what infrastructure needs to be created.
- terraform apply – Apply the infrastructure changes.
- terraform validate – Used to check if the configuration file is correct or not before running the: plan and apply command.
- terraform fmt – Format the code in the configuration file.
- terraform show – Show the current state of the file.
- terraform providers – Show all the providers.
- terraform output – Print all the output variables.
Immutable Infrastructure
When Terraform updates the resource first it destroys the old infrastructure and then makes the new one with the updated configurations.
If you don’t want to destroy the old infrastructure, add the below block in the code.
resource "google_storage_bucket" "my_bucket" {
  name 	        = “my-unique-bucket-name”
  location      = “US”

  lifecycle  {
    prevent_destroy = true
  }
}
Limitations of Terraform
- State Management: Terraform State file is the single source of truth. Terraform relies on a state file to keep track of the current infrastructure state. While this is essential for tracking changes and ensuring resource idempotence, managing the state file in a team can be challenging. Collaborative work might lead to conflicts, and the state file can become a single point of failure if not managed properly, and if somehow you lose the state file, you will not be able to modify infrastructure further.
- Limited Support for Rollbacks: While Terraform excels at making changes to infrastructure, it provides limited support for rolling back changes in case of errors or failures during the apply phase. Managing failed deployments and rollbacks often requires custom scripts or external tooling.
- Limited Support for Stateful Applications: Terraform is primarily designed for managing stateless infrastructure. While it can provision and configure databases and other stateful components, handling stateful application logic and data management requires additional tools and practices.
- No Built-in Secrets Management: Terraform does not include built-in secrets management capabilities. Storing sensitive data like API keys or passwords in plain text within Terraform configurations is a security risk.
Use external secrets management tools, such as HashiCorp Vault or cloud-native secrets managers provided by your cloud provider, to handle sensitive data securely. - Limited Built-in Functions: HCL offers a limited set of built-in functions compared to traditional programming languages. This can hinder complex data transformations or calculations within your Terraform code.
That’s all for now.
Thank you for reading!!
Stay tuned for more articles on Cloud computing and DevOps. Don’t forget to follow me for regular updates and insights.
Pingback: A step by step guide to set up Terraform to work with Google Cloud Platform - The CloudOps